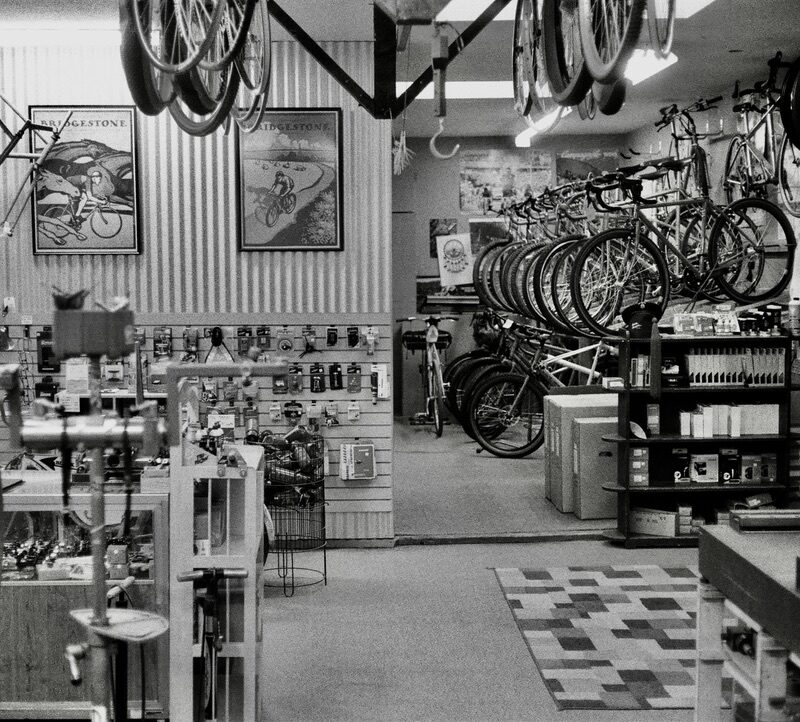
Monday, June 17, 2013

Parts on my bike (a.k.a. In praise of the triple)...

I get asked occasionally about the parts I have on my cross bike.  I also have been meaning to write something praising the triple chainring crankset since it has seemed to fall out of favor in recent years.  You see, I like my triple crankset.  The triple also serves as something of a gauge for your fitness.  Everyone has certain climbs on your regular routes that you call middle-ring climbs.  These are climbs where you can stay in the middle ring and make the climb without resorting to the granny gear.  Then there are also hills that are a little bit steeper and when you can make it in the middle ring, you know you are on top of your fitness.  Doesn't matter what gear range you have in back - the middle ring is your wireless fitness meter.  

I do understand the appeal of simplifying the front gearing on your bike.  As the number of cogs in back has gone to 10 and 11 and their range has expanded up to 10-42, yes, the triple crankset's days are numbered.  However, I'm still running an 8-speed with a spread of 13-30.  An 8-speed cassette with a range from 10-42 would have way too big of jumps between gears.  For some people, the triple combined with the lowest range possible in back is still the only way to get the range (mainly low range) they need and it's getting harder to realistically get low gears for some riders at a reasonable price.  

All of this is mainly from my point of view of bikes that I ride and build.  The majority of those are not mountain bikes, but cross or road bikes.  So, yes, there are low gearing options up front for mountain bikes, but those cranks are not necessarily compatible with a cross bike when used with road shifters.  For one, the width of the pedals is overly wide.  The chainline is also too wide for a 130 spaced rear. 

So, for know, I'll keep my triple because it works and I like it.  Now, on to the parts on my cross bike.

My cross bike
My cross bike as it sits today.  Size 62cm.  First prototype of the my cross frames.  I think I've been riding this for 4 years now.

My cross bike
I run Paul Components Mini-Moto brakes.  Love these things.  The fender is a PDW Soda Pop mountain model with the nose cut off for clearance due to the brake.  I used to run a Planet Bike clip on fender, but after breaking two of their steel mounting brackets due to riding on dirt roads, I gave the PDW a try and have to say it works way better than the Planet Bike model.  I also run the Bruce Gordon Rock 'n Road tires.

My cross bike
I recently changed up the cockpit with new bar tape and new Cane Creek SCR-5 brake levers.  This is by far the most comfortable control area I've had on the bike.  I really like the shape of the Salsa Bell Lap bars (46cm) on the bike.  The drop position is super comfortable and I can ride for very long stretches in the drops.  An old Salsa Cro-Moto stem holds the 26.0 bars.  The bar tape is PRO Digital Carbon Smart Silicon.  That's too long of a name for bar tape, but it has just the right cush and tacky feel when wet.  I used cloth tape for years, but this tape is one thing that helped keep me comfortable on last weeks 5 hour ride.  Shifters are Shimano 8-speed bar-cons (although, I think the left shifter is from a 9-speed set).  I installed the brake levers a few weeks ago and have to say the combination of bar shape, brake hood shape, and where they are positioned relative to the bend is supremely comfortable.  My only complaint is when I ride downhill and I have the levers pulled, but not so far that the brakes are "on," there is some rattle inside the levers.  I think it's the QR pins.  Easy to ignore.

My cross bike
Paul Mini-Moto brake in back with a Planet Bike clip-on fender modified to fit the brake.  Keeps the crud off my backside. 

My cross bike
My front wheel is an old Mavic SUP rim with a Shimano M900 XTR hub, 32h, from about 1995.  The rim is starting to wear to the point it will need replacing, which I'll do with a Velocity Dyad to match the back.

My cross bike
XTR M900 rear hub respaced to 130mm in back laced to a Velocity Dyad rim.  Some of the parts on this bike go back to my days at Haro when I would get parts comped to me either directly from the manufacturer or through our race team.  I think the hubs, front rim, headset, seat, seat post, and derailleurs are all from that era.

My cross bike
XTR M900 rear derailleur with an Avid Roll-A-Majig and that 8-speed Shimano 13-30 cassette.  This is one of the prototype frames which didn't have dropout adjusters.  Shimano quick release keeps the wheel from in place.  

My cross bike
There's that triple crankset.  In this case, it's a 1980s era Specialized Touring triple with 24/34/46 rings.  Yes, that is a Shimano 600 road double front derailleur moving that chain across 3 rings.  Works perfect.  It all rolls smoothly on a long-lasting Shimano UN51 bottom bracket.

My cross bike
WTB Shadow V seat with ti rails; Easton EC-70 carbon post with generous offset; trusty Jandd Mini Mtn Wedge bag holds two tubes, tire lever, Crank Bros. CB-17 tool, and now a patch kit.  The seat bag has an added toe strap to secure it.  There is also a Planet Bike Super Flash blinky light.

(What's playing:  Release Me on KWMR)

Friday, June 14, 2013

Closed June 14...

As the headline says, I'll be closed today Friday June 14.  Back in the shop tomorrow.  Have a fun Friday.  Ride lots.


Tuesday, June 11, 2013

Ride post...

It's been a long time since I did a ride post.  In fact, it was almost a year ago when I last did a ride blog and that ride was a big one too.  Over the past three weeks, I've been getting out on Sundays for some long rides.  The previous two Sundays were 5 hour bouts on the road bike with some Mt. Tam dirt thrown in.  This last Sunday was a 5 1/2 hour endurance ride on the cross bike.  

The previous two days, the temps were in the 70s in Pt. Reyes Station, which meant at least 10 degrees warmer further inland and maybe hotter where I wanted to ride.  Instead of my usual starting out with arm warmers, knee warmers, and a vest on chilly West Marin mornings, I left the house with only arm warmers, thinking that I would soon be stashing the warmers and vest in my jersey pockets and I reserved more room in my pockets for a 3rd water bottle and extra food.  However, the heavy drizzle meant that my arm warmers stayed on all day and there were times I was wishing for the knee warmers and vest, but the clothing choice worked out, just worked out.

The loop I undertook was one that I had wanted to do for a long time, but every time I set about tackling it, there was either not enough time, or the higher summer temps thwarted my desire.  I left Pt. Reyes Station heading south on Hwy. 1.  As I hit the first riser south of Olema, I saw a blinky light on a bike disappear over the crest and thought "could I catch that rider by the time I got to the Randall Trail turn off without burning up too many matches?" - it was going to be a long ride.  I didn't put too much effort, okay, I put a bit of an effort into catching the rider, which I did within 100 yards of where I was turning off on to the Randall Trail.  Turns out it was the shop landlord and owner of the old Pt. Reyes Bikes.  As I pulled along side, the first thing I noticed was the Potts titanium bike and I wonder who this rider is.  It is about the bike, you see.

After a quick chat, I turned off on to the dirt and up Randall Trail.  Randall is a good way to get up to Bolinas Ridge that avoids the rutted north section of Bolinas Ridge.  It also immediately goes into the trees where everything quiets down.  Up on Bolinas Ridge, the redwoods were pulling moisture out of the fog which then turns to rain inside the canopy.  The trail was super soaked as if it was a winter rain storm.  There are a couple sections of Bolinas Ridge that pop out from the canopy that are dry, but the majority of it is in the rain forest and it was wet and soggy.  

The roller coaster that is Bolinas Ridge ends at the top of the Bolinas-Fairfax Rd.  My route took me down Bo-Fax to Alpine Dam and the start of more dirt on the Kent Pump fire road.  From there, I took Old Vee Rd. up to Oat Hill fire road, and then to Pine Mountain fire road.  Up and over Pine Mountain and down to Kent Lake and...whoa, hold on there mister, not so fast.  Down off of Pine Mountain, at about the point furthest away from civilization (which really isn't that far), I hit something in the trail hard.  Hard enough to eject a full 26 oz. water bottle out of a King Cage.  As I stopped to retrieve the bottle, I saw that the top of the bottle had broken and I lost about 3/4 of it.  

What do you do if you have a bottle that will no longer hold water without spilling?  Drink up.  As I was finishing that bottle, I hear the air in my front tire go "WHOOSH!"  Damn, pinch flat.  Oh well, I did feel the tire bottom out.  There was a point early in the ride when I though that I should let some air out because I left the house with about 15% more air that I would run on a typical off-road ride.  Looking at the deflated front tire and contemplating replacing the tube, the back tire decided to let go with a slower "whoosh."  More like a "ssssssssssssss."  Damn.  Double pinch flat.  I hope I have two tubes in my seat pack (which I hadn't checked in a long time.  Yes, two tubes, but no patch kit, so these tubes better hold air.  They did.  

Tubes replaces, wheels back on the bike, brakes re-hooked up, it was back down Pine Mtn. fire road and then back up to San Geronimo Ridge fire road and then to the base of Kent Lake damn and back to Pt. Reyes via the Cross Marin Trail, Platform Bridge Rd., and the Pt. Reyes-Petaluma Rd.  About 45 miles with a lot of dirt.  I made it to the shop about 1/2 hour late, but had a great ride on a loop I've been trying to knock out for quite a while.  

Bolinas Ridge / Pine Mtn / San Geronimo Ridge
Up Randall Trail

Bolinas Ridge / Pine Mtn / San Geronimo Ridge
Randall Trail

Bolinas Ridge / Pine Mtn / San Geronimo Ridge
Approaching Bolinas Ridge at the top of Randall

Bolinas Ridge / Pine Mtn / San Geronimo Ridge
Bolinas Ridge

Bolinas Ridge / Pine Mtn / San Geronimo Ridge
Non-wet section of Bolinas Ridge

Bolinas Ridge / Pine Mtn / San Geronimo Ridge
The northern end of Bolinas Ridge at the intersection of Bo-Fax Rd. and Ridgecrest.

Bolinas Ridge / Pine Mtn / San Geronimo Ridge
Left and down to Alpine Dam

Bolinas Ridge / Pine Mtn / San Geronimo Ridge
Alpine Lake

Bolinas Ridge / Pine Mtn / San Geronimo Ridge
Looking up at Bolinas Ridge from Kent Pump Rd.

Bolinas Ridge / Pine Mtn / San Geronimo Ridge
Green and gray all day

Bolinas Ridge / Pine Mtn / San Geronimo Ridge
Up Old Vee to Oat Hill

Bolinas Ridge / Pine Mtn / San Geronimo Ridge
Pine Mountain Road

Bolinas Ridge / Pine Mtn / San Geronimo Ridge
Staying on Pine Mountain Rd instead of the shortcut to the right

Bolinas Ridge / Pine Mtn / San Geronimo Ridge
Wet, muddy socks

Bolinas Ridge / Pine Mtn / San Geronimo Ridge
Top of Pine Mountain

Bolinas Ridge / Pine Mtn / San Geronimo Ridge
Yep, that would be a double flat

Bolinas Ridge / Pine Mtn / San Geronimo Ridge
Very green down at the bottom near Kent Lake

Bolinas Ridge / Pine Mtn / San Geronimo Ridge
Strange 18" tall fern/grass-like plants I only saw in this one little spot.

Bolinas Ridge / Pine Mtn / San Geronimo Ridge
Left or right?  They end up at the same spot about 1/2 mile away.  I'm taking the right next time because the left has a hellacious, steep climb.

Bolinas Ridge / Pine Mtn / San Geronimo Ridge
Fron San Geronimo Ridge.  You can see the descent on Pine Mtn. Rd. to Kent Lake in the center.

Bolinas Ridge / Pine Mtn / San Geronimo Ridge

(What's playing:  Son Volt Circadian Rhythm)


Tuesday, June 4, 2013

Getting closer...

The Falconer built frames are getting closer.  Cameron came over a few days ago with a front triangle to verify tire clearance and crank/chainring clearance.  Big thumbs up on both aspects.  The final step is to finish this frame (which happens to be Cameron's size), powder coat it, build it and give it a spin to verify it works like it should and then finish the welding on all the other frames.  This will happen rather rapidly as all the other materials are ready to be fit up into frames.  We could probably just go ahead and finish all the other frames, but we like being 110% sure.  

The time it takes to get a first project like this finished also undergoes continual reassessment.  Initially, we thought we could finish all the frames in May, but there are always hurdles - and more importantly, other jobs that put food on the table.  In addition to building frames, Cameron also works in metal for construction and architectural projects.  I cannot begrudge Cameron for good paying work when it comes up.  And the reality is that even if the frames were done and painted today, it's taken an extra long time to get the decals and head badge finished.  I have final art for the decals to approve today and the artwork for the badge is still undergoing some tweaking.  Hopefully, decals, head badges, and frames are all working together amongst themselves so they're all ready at the same time.

In the mean time, there it's not too late to get your order in for one of these frames.  That is, it's not too late if you are a 62cm or 56cm size as all of the 59cm frames have been spoken for.  There are a couple of 56cm frames available and one 62cm frame.  Don't fear, though, we'll make more.  And if you want a 50cm, 53cm, or a 65cm, we'll make those too.  All I need is one order for one size and I'll go ahead with a three piece run of that size, since we need to do runs of three to make it feasible.  

Someone asked about geometry recently.  Geometry is the same as the Taiwanese sourced frame with one exception:  the bottom bracket drop was increased to 70mm, which means the bottom bracket height is 5mm lower.  Geometry is found on this page.

1st Sample Frame
50/34 ring clearance and plenty of room for a 29" x 1.75" tire.

1st Sample Frame
More than enough clearance for the Ultegra arms.  

1st Sample Frame
Triple top tube cable stop.

1st Sample Frame
Sample frame.

(What's playing:  Justin Townes Earle Far Away In Another Town)

Wednesday, May 29, 2013

Sometimes you can't see these things coming...

One of the biggest fears about buying product overseas, putting your name on it, and selling it to folks all over the country is that, despite all the precautions you've taken and steps to ensure each frame is dialed by inspecting each one before it goes out, something may go wrong.  Recently, that something was a couple of water bottle bosses.  It is evident that these two bosses were not brazed in properly. 

This actually happened once before and because it happened on a local rider's first ride, I attributed it to an anomaly.  A one-time thing.  This rider came by the shop after his ride and showed me the boss that came out and the hole in the frame.  I was horrified.  He was calm and cool.  This was one of those moments you think to yourself, "why am I doing this?  I should just be selling $400 hybrids instead of trying to do something different."  

However, once we both assessed the situation, I realized that the hole in the down tube was the same hole that was drilled for the boss in the first place and that it's not uncommon to have to replace bottle bosses on aluminum frames with new rivet nuts.  The solution of installing a rivet nut in the frame was reached and he's been going strong since that day in January.  It was a good fix.  And I forgot about it.  Until recently.

The e-mail showed up "Broken water bottle braze-ons" and I knew what happened and that it happened a second time.  One-time incidents are just that, one-time.  When it happens twice, the potential for it to happen a third time increases, but it's not likely epidemic.  I checked the frame that happened to be in the stand getting prepped for shipment by threading in a bolt and grabbing hold with some pliers twisted and tweaked the bolt.  The boss was solid.  That made me feel good. 

So, here's what's happening, two frames lost water bottle bosses (both on the down tube).  There are two solutions, as I see it, if this happens to you.
1.  Frame replacement.  I'll replace the frame to you and pay to have the frame with the lost bottle boss sent back to me.
2.  Install rivet nuts and offer some sort of compensation.  My goal is that each owner of one of my frames is happy with their bike.  This is the option chosen by the two owners.  He was comfortable using a rivet nut tool since he had used a rivet gun on airplanes.  I mailed him my rivet nut tool with a return label and some rivet nuts.  He reported back that the rivet nut install was a success.

And if, for some reason, you really, really, really want a new frame but I don't have your size or color in stock, we'll get rivet nuts installed in your frame and then replace it as soon as I get more frames so you can keep riding your bike.

That's it.  I thought about not putting this out there because that's what companies do - hide things and then act surprised when something happens.  But, I owe this to all the folks who have put their trust in my frames and I thank each of you for that.  

One final bit, this is limited to the second run of cross frames only.

And to make this long post even longer, here is the process to install rivet nuts.

Rivet nut install
The hole for a brazed in bottle boss is smaller than the rivet nut outer diameter of about 7mm.

Rivet nut install
So the hole will have to be made larger.  You can use a tapered reamer like pictured here.  Or if you have enough space within the frames front triangle, you can drill the hole larger.  Just be careful not to go too far into the tube that you punch into the other side of the tube.

Rivet nut install
A file can also be used to open the hole for the rivet nut insertion.

Rivet nut install
Verify the rivet nut fits snugly in the hole.

Rivet nut install
The rivet nut installation tool with a rivet nut.

Rivet nut install
Thread the rivet nut onto the tool's mandrell so all threads are engaged.

Rivet nut install
Back the mandrel up  so the flange of the rivet nut is flush against the tool's stop.

Rivet nut install
Fit the rivet nut firmly against tube and...

Rivet nut install
...squeeze the tool's plier handles.

Rivet nut install
When installed, the rivet nut is compressed up to the inside of the tube creating a sandwich with the frame tube. 

(What's playing:  Bob Dylay & The Band Too Much of Nothing)

Friday, May 17, 2013

More progress...

Things are cooking right along with the production of the US/Falconer made cross frames.  Cameron sent over and update yesterday.  

Mitering tubes
Mitering tubes.

Mitered tubes
Mitered tubes.  

Spray of forks
All the forks are done.

Heat Sink
Cameron made a heat sink for the dropouts.  The aluminum inserts absorb some of the heat during the welding process to eliminate deformation and burn through.

Stays
The s-bend chainstays will have clearance for the 43mm Bruce Gordon Rock 'n Road tires and any compact road crankset, including Dura Ace, Ultegra, and any from Campagnolo.

Cameron is working his ass off on the frame production.  Now, I need to get my ass in gear to get the head badge and decals made.  

(What's playing:  Led Zeppelin D'yer Mak'er)